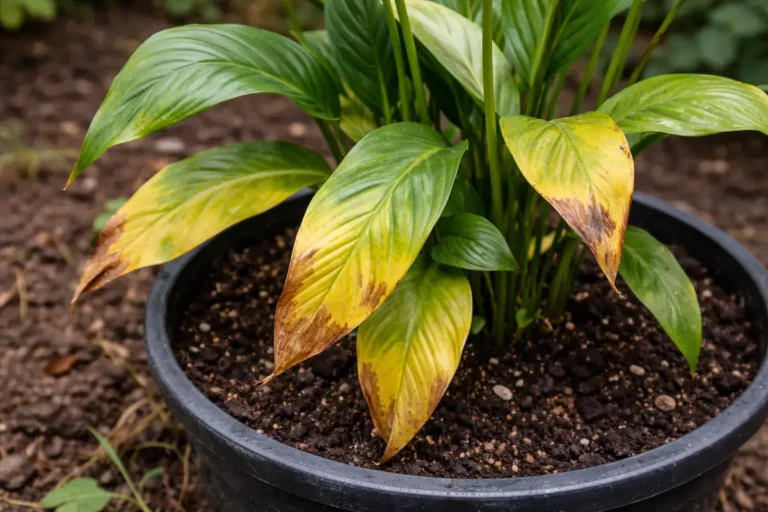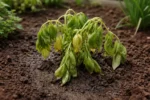
You may notice your potted herbs showing signs of distress during a period of heavy rain, which is why you need to know how to recover from root rot in potted herbs after excessive moisture. The roots may appear mushy and dark, causing the leaves to yellow and droop due to poor oxygenation. If neglected, the issue worsens and can spread throughout the plant, making recovery even harder to fix; however, you can still salvage your herbs by trimming away damaged roots and adjusting their watering habits.
Step 1 – Trim Roots of Affected Potted Herbs
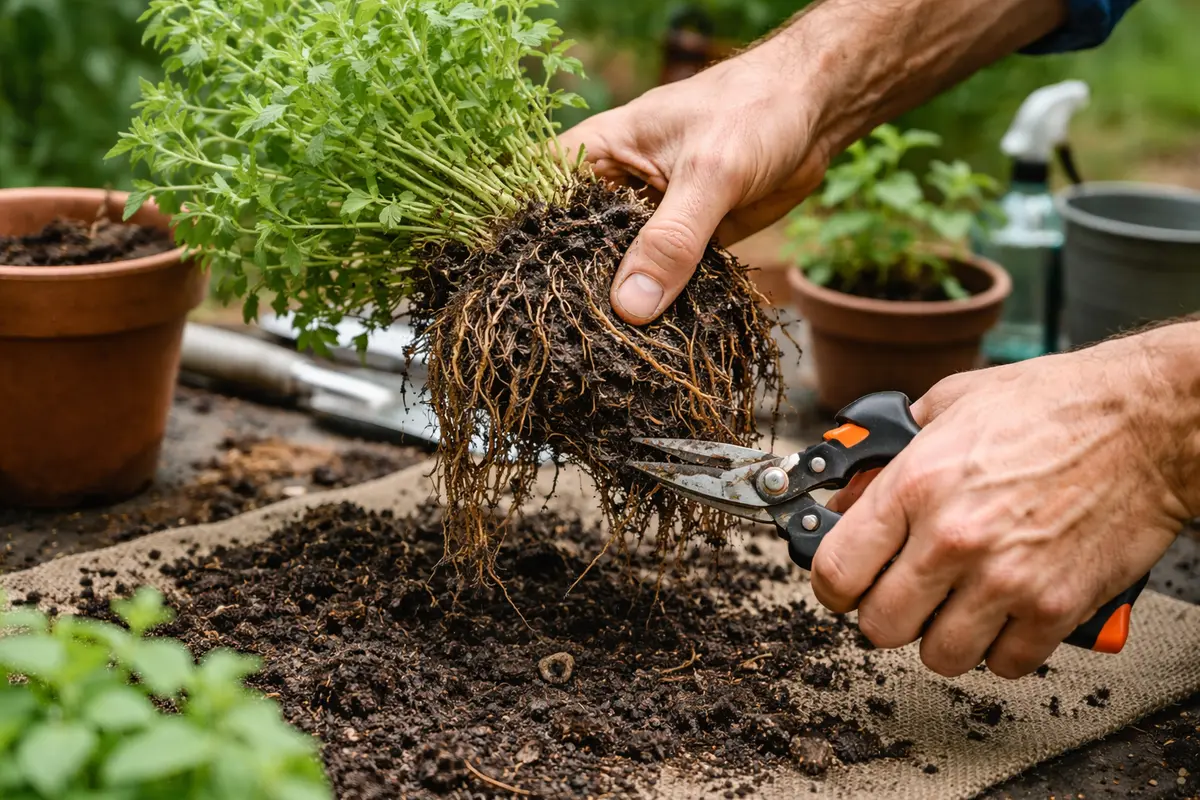
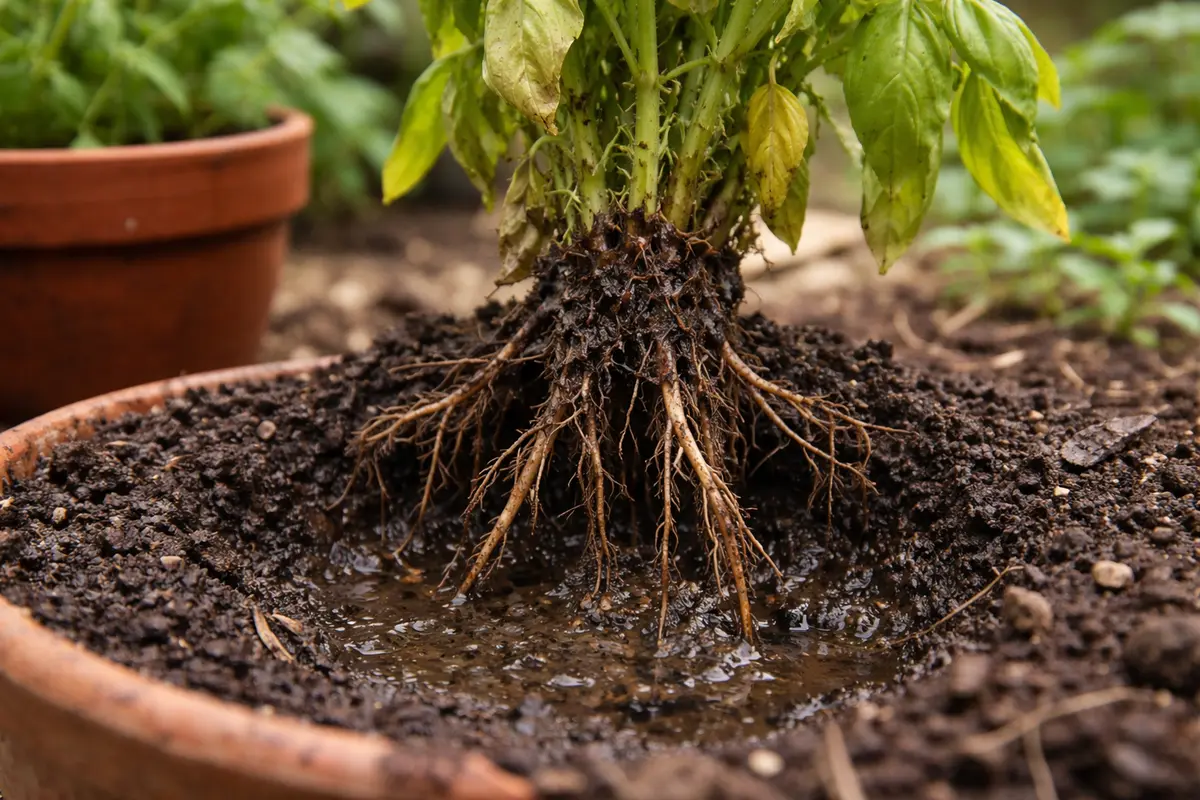
Start by gently removing the herb plant from its pot and inspecting the roots for signs of decay. Trim away any dark, mushy roots with sterile scissors, and leave the healthy, firm roots intact. This immediate action should result in a cleaner root system that will allow the plant to absorb moisture effectively as you begin the recovery process. It is also crucial to dispose of the infected roots properly to prevent further contamination of other plants.
Acting quickly is crucial because root rot is a disease caused by pathogens thriving in excessively moist environments, leading to decay and plant stress. If untreated, these pathogens can spread, overwhelming any remaining healthy roots and ultimately killing the plant. A clean, dry environment supports the growth of beneficial organisms, and a proper cutting technique minimizes damage to healthy roots, allowing better recovery. Delaying action allows harmful fungi to proliferate unchecked and can lead to a complete loss of the plant.
For example, a gardener who waited several days to address root rot found their basil plant irreparably damaged, leaving only a few viable roots. Conversely, another gardener acted immediately, successfully salvaging their oregano by promptly cutting back the decaying roots and improving drainage. If the roots are dark and mushy → check for excessive watering frequency. Make sure to also inspect the root ball carefully for any lurking pathogens in the healthier sections.
Attending to the roots right away halts further rot as it exposes and cleans up the healthy sections. This action allows the plant better access to oxygen, which is crucial since roots submerged in waterlogged soil can quickly lose their ability to absorb nutrients and water, resulting in wilted and yellowed leaves. Within a day or two, you should see signs of recovery if the remaining roots are healthy, such as the firming up of the plant’s structure and observable green growth in the upper leaves.
Many gardeners often overlook root damage when they notice wilting leaves, leading to a continued cycle of infection as they water more, mistakenly believing their plant is drought-stressed. For instance, a gardener might mistakenly provide extra water to their basil just as it begins drooping instead of checking the roots. If you get to trimming the roots within the first few hours of noticing the problem, you can significantly improve the odds of recovery. Make sure to monitor backgrowth in the following days, expecting to notice an improvement in leaf turgidity shortly after, ideally by the end of the week, when signs of resilience should manifest.
Step 2 – Diagnose Excess Moisture in Soil
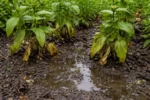
Check the moisture levels in the soil by inserting your finger about an inch deep into the pot. Specifically, if you feel a dampness that lingers beyond just a slight wetness, this suggests the soil is overly saturated, which can lead to ongoing root rot if not addressed promptly. More advanced gardeners may find it helpful to use a moisture meter for more precise readings, especially in larger containers where manual checks may not be reliable.
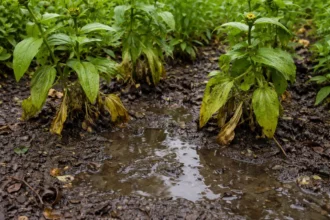
This step is crucial as correctly diagnosing excess moisture establishes the underlying issue causing root rot. Saturated soil leads to oxygen deprivation for the roots, which results in a decline in their health and enables root rot pathogens to thrive, causing visible symptoms like leaf wilting and root discoloration. At this juncture, staying vigilant is critical; for instance, inspecting the pot’s drainage may reveal clogs or compacted soil that prevents proper moisture escape, a misstep that can further exacerbate the situation.
If you notice a particularly foul smell when checking the soil, this is a clear indication of severe decay and might require immediate replanting. Be aware that if this foul smell is accompanied by a slimy texture at the root level, it further confirms the presence of rot. Don’t shy away from checking during different times of the day — soil moisture can fluctuate with temperature and humidity changes, impacting root health. Note that consistent overwatering often results from a combination of erratic rainfall and incorrect watering practices, which should be adjusted moving forward. If the downslope of moisture continues, consider whether your potting mix retains too much moisture relative to your watering needs.
Step 3 – Replant Herbs in Fresh, Dry Soil
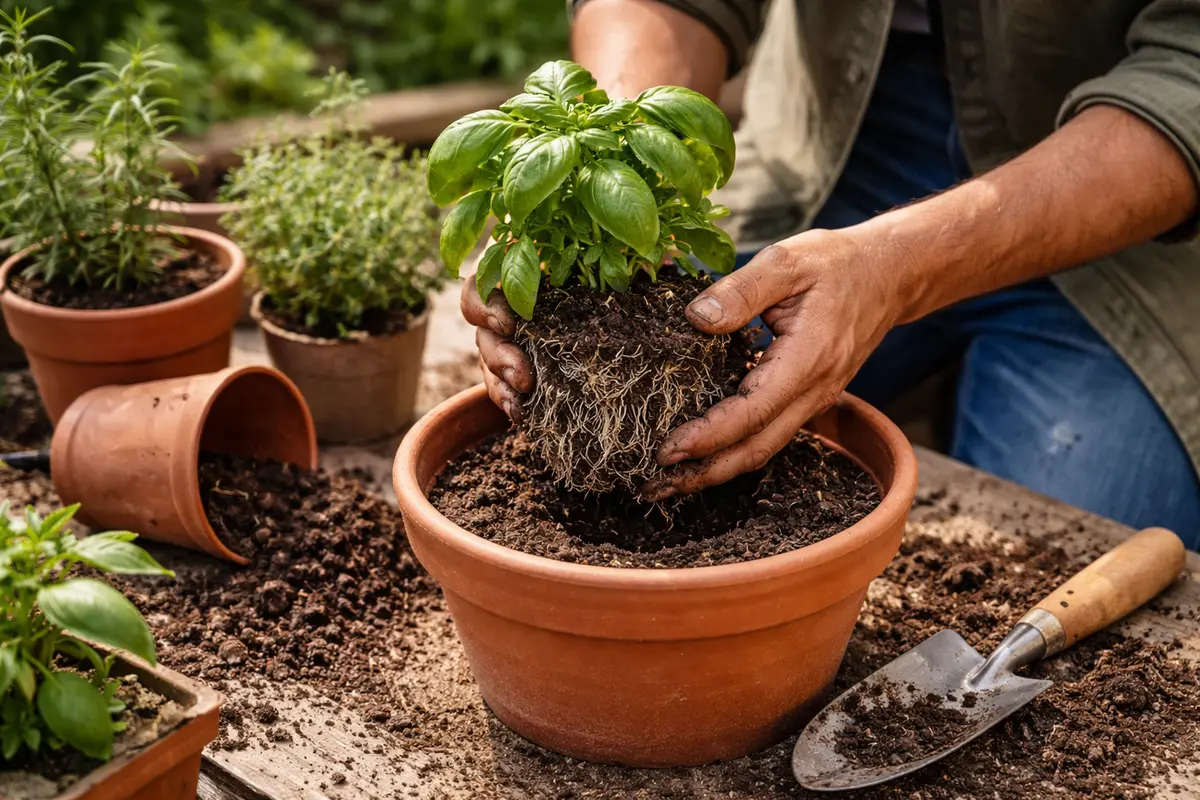
Replant your herbs in a fresh, well-draining potting mix after trimming the affected roots. You should aim for a mix that consists of peat, perlite, and vermiculite in equal parts to ensure proper drainage and aeration. After replanting, you should be vigilant for a change in leaf and root conditions. Within a few days, healthier leaves should become evident as the herbs recover and new growth begins to form; look for vibrant coloration indicating a rebound from the stress of root rot.
Using a dry potting mix helps ensure that roots have adequate airflow while also allowing for proper moisture retention without the risk of waterlogging. This change in environment encourages healthier growth patterns and removes the threat of ongoing root rot; you’ll want to watch for any signs of stress during this transitional period to ensure success. Ideally, mix in a slow-release fertilizer to give the plants an additional nutrient boost without overwhelming them with raw nutrients right after the repotting.
Be cautious not to overwater immediately following the replanting. A common mistake occurs when many people overcorrect by watering heavily, thinking it will aid recovery; however, this can lead to renewed moisture problems. The first few waterings should be minimal—just enough to settle the soil around the new roots; aim for enough moisture to maintain slight consistency without saturation. Monitor the plant closely over the next week to assess how well it adapts to its new soil, recognizing signs of renewal, like perky leaves and robust growth, by the end of the first week. If you notice a lack of development after a week or the soil remains consistently damp, this could indicate a need for another deeper inspection of the roots and soil composition.
Step 4 – Water Only at Soil Level After Treatment
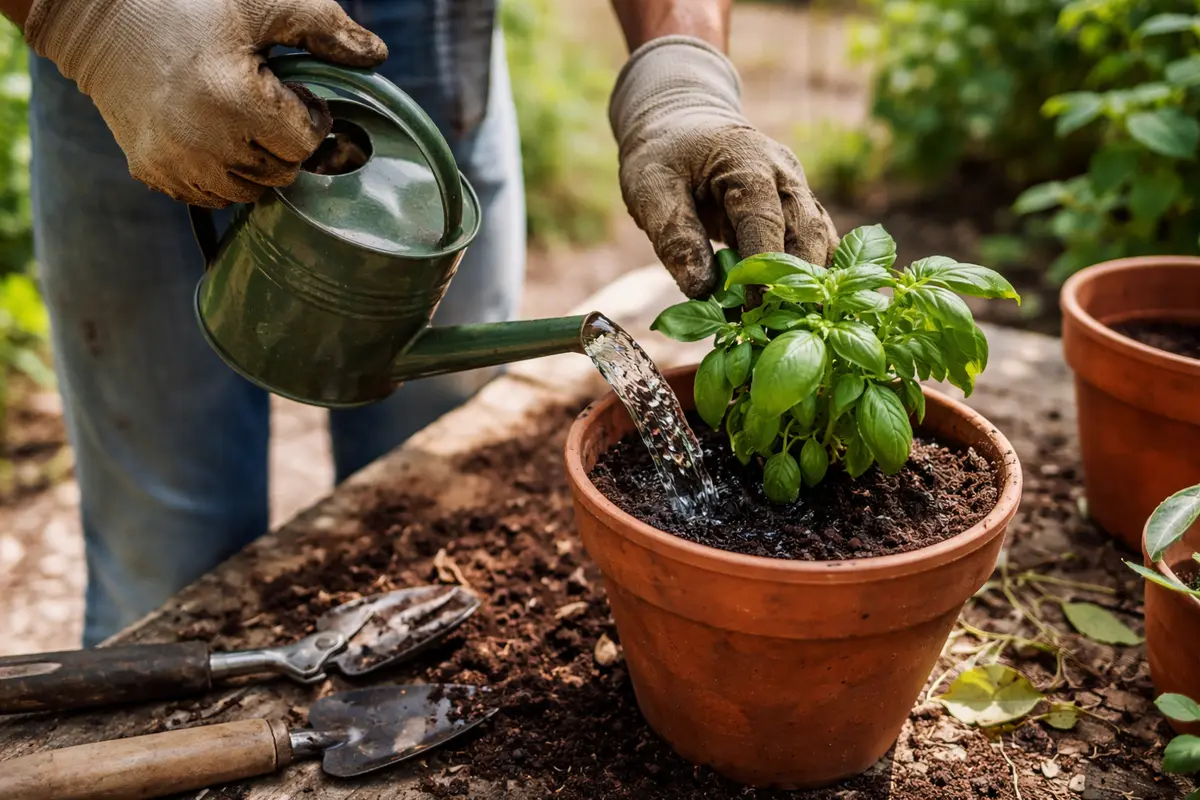
Water your herbs only at the soil level and ensure drainage holes in pots are functioning well. To test this, observe how quickly the water drains from the pot after each watering; ideally, you should see it take no longer than 10-15 minutes. Utilize potting soil that is designed for drainage to further aid in preventing water pooling at the surface, which can encourage fungal growth. This practice will prevent water from pooling on the leaves or surface soil, helping to avoid the return of moisture problems.
Watering at the soil level encourages deeper absorption and promotes healthy root growth, which is essential for overall plant recovery. Specifically, ensure that excess water can freely escape through drainage holes to further prevent additional rot. Overhead watering, particularly during recovery, can lead to excess moisture that exacerbates conditions conducive to root rot, especially if the herbs are still weak from previous damage; it’s critical at this point to observe how the plant reacts to each watering, looking for signs of wilting or yellowing.
During the growing season, maintain a watering schedule that accounts for changes in temperature and general humidity. On warm days, when moisture evaporates more quickly, you might need to check soil moisture levels more frequently, possibly every day, to establish a preferred watering rhythm. If you continue experiencing cooler weather, it is acceptable to water less than normal; however, overestimating water needs might cause hidden rot to manifest in leaf problems, leading to confusion for newer gardeners. If unsure, always err on the side of caution and wait an additional day before watering, as this gives you time to assess its condition thoroughly.
Step 5 – Inspect Herb Roots for New Growth Weekly
Start by checking your potted herbs for any signs of root rot, focusing on the moisture levels in the soil and the condition of the roots. Look for a dark, mushy texture on the roots, which indicates decay, and monitor the soil for excessive dampness or a sour odor. Recheck the plants every 3-7 days to evaluate their recovery and adjust your watering routine accordingly; noting the plant’s response to changes can reveal a lot about whether the intervention was effective.
A fully recovered herb plant displays firm, white roots and vibrant, green leaves without yellowing or wilting. In contrast, early signs of root rot returning include a noticeable blackening of roots and leaves beginning to droop despite adequate soil moisture. If you see the leaves turning yellow and the roots are slimy again, check the soil drainage immediately, as poor drainage could be the issue and warrants consideration of a different potting mix that may improve aeration.
If root rot symptoms return despite following recovery steps, take immediate action by repotting the herbs in fresh, well-draining soil and enhancing aeration around the roots. During repotting, ensure adequate pot drainage with holes and consider using a fungicide if necessary for persistent fungal issues that affect regrowth. If problems continue, escalate the situation by consulting local gardening experts or resources for advanced disease management options tailored to your specific herbs.
Monitoring the herbs closely allows you to detect any early signs of relapse. When roots regenerate and healthy green shoots begin to emerge, it’s a positive indicator that your intervention was successful. This can manifest as thicker, greener stems or faster foliage production during inspections; as this occurs, consider gently loosening the soil, making sure it remains airy without losing bulk. Conversely, if you observe more wilting or leaf discoloration, this signals a need for additional action; if roots appear brown or mushy again, it may be time to reevaluate the soil conditions, such as compacted dirt or non-draining media.
If at any point the original symptoms resurface despite your best efforts to dry out the soil and keep moisture in check, consider repotting again or taking further steps to improve soil drainage. This might involve choosing a lighter, more porous potting mixture to improve airflow around the roots or using larger pots to allow for better root expansion. Additionally, if you notice persistent yellowing in leaves after weeks of proper care, contact local gardening centers for suggestions on soil amendments or further treatments tailored for herb recovery, as they may have specific formulas designed for various herbs or conditions.
FAQ
How long will it take for my herbs to recover from root rot?
Recovery time for potted herbs can take anywhere from a few days to a couple of weeks, depending on the extent of root rot and how well you implement corrective measures. Keeping ideal environmental conditions, such as moderate sunlight and optimal temperatures, is essential; increased humidity can be beneficial, but not too much. You should notice new growth within one to two weeks if the environment is conducive to recovery and if the roots are healthy.
Should I remove all the affected parts of the plant immediately?
While you should remove the obviously damaged roots promptly, it’s not necessary to cut away all leaf material right away. Focusing first on damaged or yellowing leaves is essential, as healthy leaves can still provide energy for the plant’s recovery; for example, a small portion of green foliage can still be enough for photosynthesis. It’s often better for the plant to maintain some leaf area to photosynthesize while roots recover, as cutting too much can lead to additional stress and hinder growth.
Will my herbs recover if I missed the signs of root rot early on?
Recovery is possible even if you miss early signs, but the chances decrease as root rot progresses and the extent of damage increases. Prompt corrective steps like trimming dead material and replanting significantly enhance their recovery potential, though it may require closer monitoring afterward. If you find you’re addressing significant rot after extended exposure, consider adjusting your care routine, focusing on environmental factors contributing to ongoing moisture issues or reevaluating pot size and soil quality.